Monday, December 21, 2015

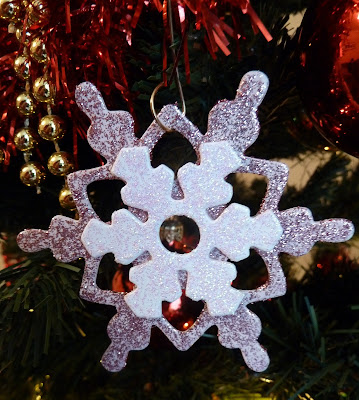
Glittery Snowflakes

     Now I love snow, snowflakes especially and have quite a collection of snowflakey things to craft with. I just can't pass them by. So when Sarah-Jane, The Fruit Pixie sent me the new Woodware Chipboard snowflakes Chippies I just couldn't wait to play with them!

For me Christmas snowflakes have to sparkle, that's just the law, but I also wanted them to have colour too. The best way to get both I found was to paint then first and then glitter them.


For this one I painted the largest snowflake with the Cosmic Shimmer chalk paint Alice Blue, the middle snowflake Cosmic Shimmer Nude and the top one with the Cosmic Shimmer Warm White.

For the glitter I reached for my Cosmic Shimmer Sparkle texture paste which I applies with a paint brush. The largest snowflake is covered in Silver Moon sparkle paste, the middle one in Pink Blush sparkle paste and the top one in Aurora sparkle paste.

I left them all to dry over night then layered them up using PVA glue. You will need a wet glue because of all that wonderful glitter! I then added a gem to finish it off.


Snowflake 2 was painted with the Cosmic Shimmer chalk paints Nude and Warm White and then covered in the Cosmic Shimmer sparkle paste Pink Blush over the Nude paint and then Aurora sparkle paste over the Warm White chalk paint.

Again I left them to dry over night and layered them up using PVA glue.


For the final snowflake I decided to try a darker colour. The top snowflake was painted with PaperArtsy  London night paint and the bottom snowflake in PaperArtsy Snowflake.

I then covered them in the Cosmic Shimmer sparkle paste Silver Moon over the London night paint and Aurora Cosmic Shimmer sparkle paste over the Snowflake paint.

It was made in the same way as the others and a large gem added at the end to finish it off.

These look so pretty hung on the tree. 

You can find what I used in the Frute Pixie shop by following these links - 

WoodWare Snowflake Chippies - http://www.thefruitpixie.co.uk/woodware-chipboard-414-c.asp

Cosmic Shimmer Chalk paint - http://www.thefruitpixie.co.uk/cosmic-shimmer-paints-644-c.asp

Cosmic Shimmer Sparkle paste - http://www.thefruitpixie.co.uk/cosmic-shimmer-texture-paste-622-c.asp

The gems are from my own stock


Thursday, December 17, 2015

Magic of Christmas star box scene

Today I have a cute little 3D project to show you using the Craftworks cards Magic of Christmas kit.This kit is available from The Fruit Pixie.

     I love the little 3D scenes people build for Christmas, so these have inspired me to build my own. Now I made my star box using my Sillhouette Cameo but you can easily buy one of the little card boxes available on the market.


I covered the inside and outside of the star box using the Magic of Christmas papers. 


I then covered the back of the star with the same paper as the outside. The little deer is cut from one of the many die cut toppers that is in the kit. 

To give a background to my scene I cut a scrap of white card into hills and added some die cut trees. I then put my little deer on 1 layer of 3d foam.


I then cut some more snowy mounds for the foreground and built them up on 3d foam pads.


I cut up another of the die cut toppers for the Seasons Greetings and used some of the paper to cut the pinecone and leaves. Before I added these though I glued some of the Ranger tinsel around the box using my hot glue gun. I then added the collage pieces I had cut out earlier.


I think my little box looks very vintage. It was such fun to put together.

You can find the Craftwork Cards Magic of Christmas kit here - http://www.thefruitpixie.co.uk/christmas-38-c.asp


Monday, December 14, 2015

Magic of Christmas Christmas cards

I have been lucky to of had the Craftwork cards Magic of Christmas kit sent to me by The Fruit Pixie. The kit has a beautiful vintage look and has plenty of papers, die cut sentiments and of course their Candies to meet everyone's needs.

   To begin I have made a couple of very simple cards but as you can see they look lovely.


This card used just one of the 8x8 papers. I cut the paper to fit my square 5x5 white card base and then cut the JOY letters out of the remaining paper and glued them onto the card. I then just added a die cut snowflake using one of my many snowflake dies then used my clear star glitter pen to finish the card off.
 A very simple but effective card


My second card used a Craft card card blank and one of the papers as a background. I then cut the bird from another of the papers in the pack. The Merry Christmas topper is one of the many die cuts that comes in the pack too. The holly and other greenery is from another paper in the pack, just cut out and collaged onto the card making it looks very Victorian I think.

This kit has so many options for cards and all kinds of other projects, its well worth looking at 
http://www.thefruitpixie.co.uk/christmas-38-c.asp

Saturday, December 12, 2015

Candle Jars

 One thing that is a must have a Christmas for me is candles. I love their soft glow. I also have a thing for nice shapes jars, don't ask me why but I just can't seam to recycle a nice jar. So I decide to use the lovely Craft Consortium tissue available from the Fruit Pixie to decorate a couple of my jars and make candle jars.

         The Tissue cuts like a dream in your die cutting machine or you could cut the shapes out free hand too.


This one is a Christmas themed jar. I cut a strip of the Craft Consortium distressed wood 2 tissue that was deep enough to cover my jar and then cut it to the right length. Using my dies I cut a reindeer with a tree either side. I then applied PVA glue to the jar and gently placed the tissue onto the jar and smoothed it down. Make sure it is all stuck down well and leave to dry.
I finished the jar off with a bow of the snowflake twill and a snowflake charm from my collection.  


For this jar I cut a strip of the Craft Consortium tissue in the same way as the Christmas jar and then just cut a single star in the centre of the strip using a die. I then applied PVA to the jar and gently smoothed the tissue onto the jar.
To finish the Star Jar I used some hemp garden string and added a couple of charms too.

There are so many ways you could decorate these jars and they would make lovely handmade gifts too. There are some beautiful Christmas Craft Consortium tissue in the shop now too.

You can find the Craft Consortium tissue here - http://www.thefruitpixie.co.uk/art-papers--cardstock-9-c.asp 
Snowflake twill here - http://www.thefruitpixie.co.uk/ribbons--trims-nproducts179curpage-3-179-c.asp
The Tre'penny charm here - http://www.thefruitpixie.co.uk/charms-beads-crystals--gems-nproducts33curpage-2-33-c.asp


Monday, December 07, 2015

Christmas cards!!!

Christmas feels very close to me now as it was our Christmas crop last weekend and I gave out my first Christmas cards to my very talented crafty friends!

   I always make special ones for my crafty friends, this year I used my trusty Shillouette Cameo and the Bo Ho Ho kit from Lettering Delights. I love the shapes of the little Christmasy people.


The papers are also from Lettering Delights.
                   

From our house to yours card

 Christmas is getting closer and closer now and I have another lovely card using Craftworkcards Festive Chalkboard cardmaking kit, available from The Fruit Pixie


This time I cut a central stepper card out on my Sillhouette Cameo and used the papers to cut out the house, again using my Cameo. The papers cut like a dream! The tag and the sentiment are from the kit as well as the Candies.

I think this kit has sort of changed my mind about black at Christmas, I have really enjoyed making things with it, The paper is a lovely quality and there is plenty of it to use. Then again that is what I have come to expect from Craftwork Cards.


Friday, November 27, 2015

Festive Chalkboard chalkboard Christmas countdown

       I love the build up to Christmas, once I have got all the Christmas shopping out the way that is, I have so many advent calenders that I have made over the years but there is always room for one more! This is one I have made for The Fruit Pixie using the lovely Craftwork Cards Festive Chalkboard kit.


This was very easy to make. 

I used the wonderful Craftwork cards Festive Chalkboard set to make this.
First I cut a star out of a sheet of the Festive Chalkboard paper and then did the same but made the star slightly smaller in a deep red card, This then gives you a thin red boarder around your star. Place a piece of the Chalkboard Sheets by Forever in Time behind the star to make the blackboard.

I then stick them together and used the thick chipboard backing to the paper pad to give me my base and covered the back with another piece of the Festive chalkboard papers. Punch your holes and add some ribbon to hang it up with.

For the decorations I used the frames from the Festive Chalkboard kit and put some black card behind them. I used die cut letters for the "Days to Christmas"  and added one of the lovely bows to pull all the frames together and finish it all off.

Then all you need is to add some glitter, it is Christmas after all, find a piece of chalk and you are ready to count down to Christmas in style!!

The Fruit Pixie online shop - http://www.thefruitpixie.co.uk/

Snow princess box card

My young next door neighbour and craft prodigy was 10 yesterday! So of course I had to make her an amazing card for her birthday. Instead of a card card I decided to go for a box card. As she loves Frozen and I have a rather large collection of snowy things ( they are my favourite things) I thought this would be perfect!


Of course my Silhouette Cameo electronic cutting machine played a huge part. All the individual parts can be bought from the Silhouette store.

Happily I can also report that she loved it!!

Sunday, November 22, 2015

Chalkboard Christmas cards

The Fruit Pixie now sells Craftwork Cards! I have loved their products for many, many years and so I was so excited when The Fruit Pixie sent me the new Christmas packs.

    It was hard, as usual, to choose which one to begin with but I eventually chose to start with the Chalkboard Christmas set.

   Now, I would not normally use black at Christmas, when it comes to the festive season I am defiantly a vintage traditionalist, red, gold and green is our chosen colours at home and we bring out the same decorations year after year, which I love. So I thought I would give this set a go and I have to say I loved using it, as you will see I hope.


Here is my first card, nice and simple using part of one of the papers in the pad along with a sentiment and 2 die cuts. I just love that little bird!!


The second one is using another paper but this time I have cut out the image and used 3d foam to give it some hight. I then used the other half of the same paper as a backing paper and just added a sentiment to finish it off.

As you can see by these couple of cards you can make quick and easy cards with the set that look striking. You can also spend more time and create bigger and more involved projects with it too, as I will show you in the coming weeks.

You can find the set here - http://www.thefruitpixie.co.uk/craftwork-cards-8-x-8-collection-pack-festive-chalkboard-25677-p.asp

There is also a Magic of Christmas set too, so stay tuned for that one too!!


Wednesday, November 11, 2015

Art Journal Emporium November bundle

As a member of the Art Journal Emporium and a member of their design crew I get a fantastic digital kit at the beginning of each month to play with. This months is just beautiful, full of wonderful Victorian style blooms with that altered edge.

    As a member of the Emporium we also have a great forum where we are given challenges to work with using the kits and there are even a draw at the end of the month with a small prize too. You can find out all about the Art Journal Emporium here - http://shoptangiebaxter.com/pages/art-journal-emporium

  So here is my mixed media page using the November kit. I made up my background using acrylic paint and stencils to incorporate one of the collage pieces in the kit. I then collaged the rose, butterfly and ribbon strips over the top and added a bit more paint and stencil work to help them blend in. A hand lettered word finished my page off and fitted in with the challenge, well sort of!!


If you want to start Art Journaling but just don't know where to start or love to journal but want to be part of a community the the Emporium is worth a look. Tangie, the artist who runs the Emporium is very generous with her talent and products.

 Please don't let the fact that it is digital put you off. I don't do digital art very often but I love digital supplies as you can just print out what you want, the exact size you need and how ever many you need. Many of my crafting friends have been surprised that they were printed at home, I have not got an expensive printer. Not to mention all the storage space I save on!! Why not give it a go?

Sunday, November 01, 2015

Art journal emporium October collage sheets

Every month in the Art Journal Emporium we get a set of wonderful collage sheets to use in our journalling. I can now proudly say I am a member of their design crew too!

     Here is my October page using a couple of the collage sheets.


You can find information about the Art Journal Emporium here - http://shoptangiebaxter.com/pages/art-journal-emporium

Saturday, October 31, 2015

Happy Halloween

Happy Halloween everyone!!  I love to make things for Halloween, I have never been trick or treating, my generation here in the UK never even had Halloween when we were children. Now though we make a night of it, hubby carves a pumpkin while I decorate the mantelpiece and make soup and other treats before we turn off all the lights, OK so we pretend we are not home, settle down and watch all our favourite old horror films. If its after about 1970 then we are not interested, it has to be either Peter Cushing or Christopher Lee!!

     So over the years I have made a lot of decorations, some for design team assignments and some in swaps and some just for me. This years new decoration is my very cute Halloween House made with my Silhouette Cameo machine and by SVG Cuts. I am so pleased with it and my little Voodoo Dolls are just the right size to attack it!!


Here is this years mantelpiece decorations


The books at the end are all altered books on Halloween themes. Skelli was a plastic skeleton from the pound shop I covered in book pages and painted then made him a top hat and dressed him ready for a night on the gravestones!


This wonderful Dracula is one of my favourite ever swaps He stays out all year in my craftroom.


Two more small houses I made this year with my Cameo, these are from LD Designs


Lastly my witch doll, printed cushion and Day of the Dead shrine completes the look!

Its amazing how a collection grows over the years. If anyone who's art is here is reading this thank you! As you can see your work is treasured and comes out each year to be admired.


Friday, October 30, 2015

Halloween mixed media frame

   I have a little Halloween project to show you today that I have made for the Fruit Pixie using some of the wonderful mixed media things she sells.


I began with one of the Crafty Individuals chipboard frames which I painted with the Cosmic Shimmer paint Midnight black on both sides along with one of the chipboard swirls from the same sheet.


When the paint had dried, it did need 2 coats I smeared on some PVA glue. I wasn't worried 
 about how well it covered, then rubbed in some of the Cosmic Shimmer polished silk glitter, I used Sahara gold. I did the same on the swirl too


I then ran some more PVA glue around the swirl, the inside of the frame and the top of the frame and poured some of the Cosmic Shimmer Glitter Jewels Midnight Snow,
 pushed them into the PVA , poured them off and let them dry thoroughly.


Once everything was completely dry I made up one of the flowers from the Graphic 45 Steampunk Spells collection and added some glitter glue and one of the Creative Expressions vintage black buttons to the centre. I also made a couple of paper streamers from scraps of the Graphic 45 Steampunk Spells paper. Then I stuck them onto the middle of the swirl and the swirl to the corner of the frame.


I wanted my frame to hang so I punched a couple of holes in the top swirl of the frame and made up a couple of paper beads by rolling a small strip of the Graphic 45 paper around a cocktail stick. I threaded a length of wire through the bead, gave a few twists to secure the bead on the wire and then through one hole, left a short length then back through the other hole and through the other paper bead and twisted the wire off to secure as you did the first. I had left some wire at both ends to curl to finish it off.


Then all you need is something to fill your frame with. I used one of the Graphic 45 Steampunk spells images in mine but you could use what ever you like.

You can find the things I used in The Fruit Pixie shop here -

Chipboard frames - http://www.thefruitpixie.co.uk/crafty-individuals-chipboard-399-c.asp

Cosmic Shimmer paint - http://www.thefruitpixie.co.uk/cosmic-shimmer-paints-nproducts644curpage-2-644-c.asp

Cosmic Shimmer Polished glitter - http://www.thefruitpixie.co.uk/cosmic-shimmer-polished-silk-glitter-600-c.asp

Cosmic Shimmer Glitter Jewels - http://www.thefruitpixie.co.uk/cosmic-shimmer-glitter-jewels-603-c.asp

Graphic 45 Steampunk Spells flowers - http://www.thefruitpixie.co.uk/steampunk-spells-614-c.asp

Creative Expressions Vintage buttons - http://www.thefruitpixie.co.uk/creative-expressions-embellishments-nproducts464curpage-2-464-c.asp


Monday, October 26, 2015

Scary Halloween paper doll

Krysty Designs, who I design for, has a new Halloween digital kit out today. Its called Scary and is available through Mischief Circus.

     Even though it is a digital kit it is very easy to use it to make what ever you want. For this kit I decided I would make a Halloween paper doll.


You can find Krystys kit here - http://www.mischiefcircus.com/shop/

Saturday, October 24, 2015

    Now I have been creating altered art now for many years and up until a year or so ago I thought an ATC was an Artist Trading Card, a card 2.5 x 3.5 inches which is then decorated in your style and traded with another collector. I have a great deal of these wonderful cards which are all filled away safely and treasured.

   Now though there is a new kid on the block  ( sorry )   an Artist Trading Block or Cube. This cube can be any size you like and decorated on all sides then traded with other collectors. The nice thing about these are they are easier to leave out on display and gives you a lot more space to decorate.  I have known about these cubes for a while now but have just not gotten around to making one but now I have made one for The Fruit Pixie.


I made the base of my cube from brown card stock and decorated it before I stuck the cube together.


Then used the Marion Smith Designs Time Keeper papers to cut mats for each side


and then cut out the different images with in the papers to collage over the top.


These papers make it so easy to make up our collage


There are so many lovely images to choose from and they are very easy to cut out.


I decided to make little feet for mine. I made them by cutting thin strips of the leftover paper and then rolling them up into a paper bead. I made 2 then cut them in half to form the feet.

These papers are available from The Fruit Pixie online shop - http://www.thefruitpixie.co.uk/

You can find these lovely Marion Smith design papers here - http://www.thefruitpixie.co.uk/marion-smith-designs-680-c.asp


Tuesday, September 29, 2015

The new Marion Smith Design papers from The Fruit Pixie, who I design for, are right up my street and I just couldn't wait to get crafting with them. They have lots of great collage pieces on them and they have not been overly collaged for you too much so it leaves you to do with them what ever you wish. 

As I expect you can tell I love to collage and so I decided use the Timekeeper set first and to make a collaged file folder using the file that comes on the Portfolio 12x12 sheet. 


So to begin with I simply cut out the file folder, scored it and folded it in half. I then inked around the edges. The word Journey comes from the Tinker page.


I then used the Gypsy clear stamps, the Timekeeper set would work as well, to stamp a background on the inside cover and used the different components from the papers to collage. The die cut cogs are cut from one of the Tim Holtz dies but you could use any Steampunk style dies.


Don't you just love this image!


I wanted something inside the file folder so I made up the envelope from the Tinker 12x12 sheet and made what is called a "Tip in " by attaching the envelope lengthwise using washi tape to the fold of the file folder then turning the page so to speak and attaching it on the back as well with the same washi tape. This then makes a new page. I used one of the Tim Holtz washi tapes as it seamed to go quite well but you could use anything you have. I then used more of the elements on the papers and the stamps again to fill in the spaces.


I then made a tag to go inside the envelope, I love to have bits hidden away to find. For this I just used a scrap of card and some of the collage elements again. The Timekeeper word is in fact the name on the tare strip of the paper.


I then collaged the reverse of the envelope


I had great fun collaging this file, there are so many great elements in this paper collection


I just couldn't resist making this little pull out using the top hat advertisements, such fun!

This is not the only project I have made using this paper collection, so if you liked this project then stay tuned!!

This is such a versatile collection, if you like to make vintage style cards or any vintage style project in fact then there is so may elements to use. It is also beautiful paper to work with too. I am so looking forward to trying the Gypsy collection by Marion Smith Designs.

You can find them here at The Fruit Pixie online shop - http://www.thefruitpixie.co.uk/timekeeper-682-c.asp